Messing around with Scapy
Here’s a really cool tool I’ve meaning to talk about for a while - Scapy!
What Heck is Scapy?
Scapy is a Python library specifically for messing with packet crafting, whether it’s ethernet, WiFi, CAN, Bluetooth, etc. Additionally, it’s a great tool to work with custom protocols that may not necessarily have tools readily available for reading and sending packets.
Hands on Learning
Easiest way to get familiar with Scapy is to just start messing with it.
Installation
I’ll be using my current Linux platform, Ubuntu 18.04. Since I like to keep my Python packages separated, I use virtualenvwrapper to install Scapy with. You can install it with pip but I like to have at least the latest tag (2.4.4 as of this post) on mine.
# make virutalenv scapyenv with Python3
mkvirtualenv scapyenv -p $(which python3)
# if you're not dropped in the virtualenv, activate it
workon scapyenv
# clone, checkout tag 2.4.4, and install
git clone https://github.com/secdev/scapy.git
cd scapy
git checkout tags/v2.4.4
python setup.py install
Scapy should now be installed in your virtualenv scapyenv. You can start the Scapy CLI just like this and it should start up:
(scapy) daniel@thinking:~/scapy$ scapy
INFO: Can't import matplotlib. Won't be able to plot.
INFO: Can't import PyX. Won't be able to use psdump() or pdfdump().
INFO: Can't import python-cryptography v1.7+. Disabled WEP decryption/encryption. (Dot11)
INFO: Can't import python-cryptography v1.7+. Disabled IPsec encryption/authentication.
WARNING: IPython not available. Using standard Python shell instead.
AutoCompletion, History are disabled.

                     aSPY//YASa
             apyyyyCY//////////YCa       |
            sY//////YSpcs  scpCY//Pp     | Welcome to Scapy
 ayp ayyyyyyySCP//Pp           syY//C    | Version 2.4.4
 AYAsAYYYYYYYY///Ps              cY//S   |
         pCCCCY//p          cSSps y//Y   | https://github.com/secdev/scapy
         SPPPP///a          pP///AC//Y   |
              A//A            cyP////C   | Have fun!
              p///Ac            sC///a   |
              P////YCpc           A//A   | Craft packets like I craft my beer.
       scccccp///pSP///p          p//Y   |               -- Jean De Clerck
      sY/////////y  caa           S//P   |
       cayCyayP//Ya              pY/Ya
        sY/PsY////YCc          aC//Yp
         sc  sccaCY//PCypaapyCP//YSs
                  spCPY//////YPSps
                       ccaacs

>>>
Since I didn’t install the other packages into my virtualenv, Scapy complains a little but you can use it as is.
Interface Setup
In this case, I’ll be collecting and crafting WiFi packets, so I’ll need to prep the interface a bit for that. You’ll first need to put the wireless interface into monitor mode in order to both listen to packets over the air and inject packets over the air.
(scapy) daniel@thinking:~$ iw dev
phy#1
	Interface wlan0
		ifindex 22
		wdev 0x300000003
		addr b4:74:9f:a7:03:51
		type managed
		txpower 20.00 dBm
(scapy) daniel@thinking:~$ sudo ip link set wlan0 down
(scapy) daniel@thinking:~$ sudo iw phy phy1 interface add wlan0mon type monitor
(scapy) daniel@thinking:~$ sudo iw dev wlan0 del
(scapy) daniel@thinking:~$ sudo ip link set wlan0mon up
So what happened here? What we did was essentially what a tool like aircrack-ng does under the hood when you set your interface into monitor mode, except here we used Linux’s built-in iw and ip tools to interact with our wireless interfaces. First, with iw dev, we show a list of all our active wireless interfaces, mine being wlan0. If it’s active, we need to shut it down with ip link set wlan0 down. Next, we create our virtual interface (wlan0) off of the physical interface (phy1)(1), using iw phy phy1 interface add wlan0mon type monitor. Delete our old virtual managed interface iw dev wlan0 del, and we can bring our new virtual monitor interface up with ip link set wlan0mon up. If you didn’t get any errors, the result should look something like this:
(scapy) daniel@thinking:~$ iw dev
phy#1
	Interface wlan0mon
		ifindex 23
		wdev 0x300000004
		addr b4:74:9f:a7:03:51
		type monitor
		channel 1 (2412 MHz), width: 20 MHz (no HT), center1: 2412 MHz
		txpower 20.00 dBm
Depending on your use case, it may be important to note the channel and width parameters your interface is showing. If you want to send packets to a device on channel 3 that has a bandwidth (width) of 40MHz, you’ll need to set your interface to that channel on that width in order for your computer and that device to have a conversation on, with something like this:
(scapy) daniel@thinking:~$ sudo iw dev wlan0mon set channel 3 HT40+
If you get lost, iw provides helpful hints:
Usage: iw [options] dev <devname> set channel <channel> [NOHT|HT20|HT40+|HT40-|5MHz|10MHz|80MHz]
Packet Sniffing
Let’s dip our feet into packet sniffing first with Scapy. Using dedicated tools like Wireshark is preferred if you’re trying to dig into what’s in a packet with a GUI, but Scapy can work in a pinch as well. Let’s try running the Scapy CLI.
(wifi) daniel@thinking:~$ scapy
In the terminal, sniff() is how we capture packets. We will need to provide the interface name at iface. The prn argument is an action you do for each packet received. In this case, we use a lambda function to simply show the packet summary.
>>> sniff(iface="wlan0mon", prn=lambda x: x.summary())
Traceback (most recent call last):
  File "<console>", line 1, in <module>
  File "/home/daniel/.virtualenvs/scapy/lib/python3.6/site-packages/scapy-2.4.4-py3.6.egg/scapy/sendrecv.py", line 1054, in sniff
    sniffer._run(*args, **kwargs)
  File "/home/daniel/.virtualenvs/scapy/lib/python3.6/site-packages/scapy-2.4.4-py3.6.egg/scapy/sendrecv.py", line 925, in _run
    *arg, **karg)] = iface
  File "/home/daniel/.virtualenvs/scapy/lib/python3.6/site-packages/scapy-2.4.4-py3.6.egg/scapy/arch/linux.py", line 446, in __init__
    self.ins = socket.socket(socket.AF_PACKET, socket.SOCK_RAW, socket.htons(type))  # noqa: E501
  File "/usr/lib/python3.6/socket.py", line 144, in __init__
    _socket.socket.__init__(self, family, type, proto, fileno)
PermissionError: [Errno 1] Operation not permitted
If you run into this issue, the reason is because you’re not running Scapy as root, which is necessary because access to our wireless interface requires root priviledges. There are some (messy) ways around this such as with setcap but that is not a great way to do things. For now, easiest way is to close the session and restart with sudo $(which scapy), which will allow your virtualenv’s Python binary to run Scapy as root.
>>> sniff(iface="wlan0mon", prn=lambda x: x.summary())
RadioTap / Dot11FCS / Dot11Beacon / SSID='NeighborSSID' / Dot11EltRates / Dot11EltDSSSet / Dot11Elt / Dot11EltERP / Dot11EltRates / Dot11Elt / Dot11EltHTCapabilities / Dot11EltRSN / Dot11Elt / Dot11Elt / Dot11EltVendorSpecific / Dot11EltVendorSpecific / Dot11EltVendorSpecific / Dot11EltRSN
...
Packet Crafting
Now that we can sniff packets, let’s try making them. Here, we can craft a beacon frame with an SSID of our choosing.
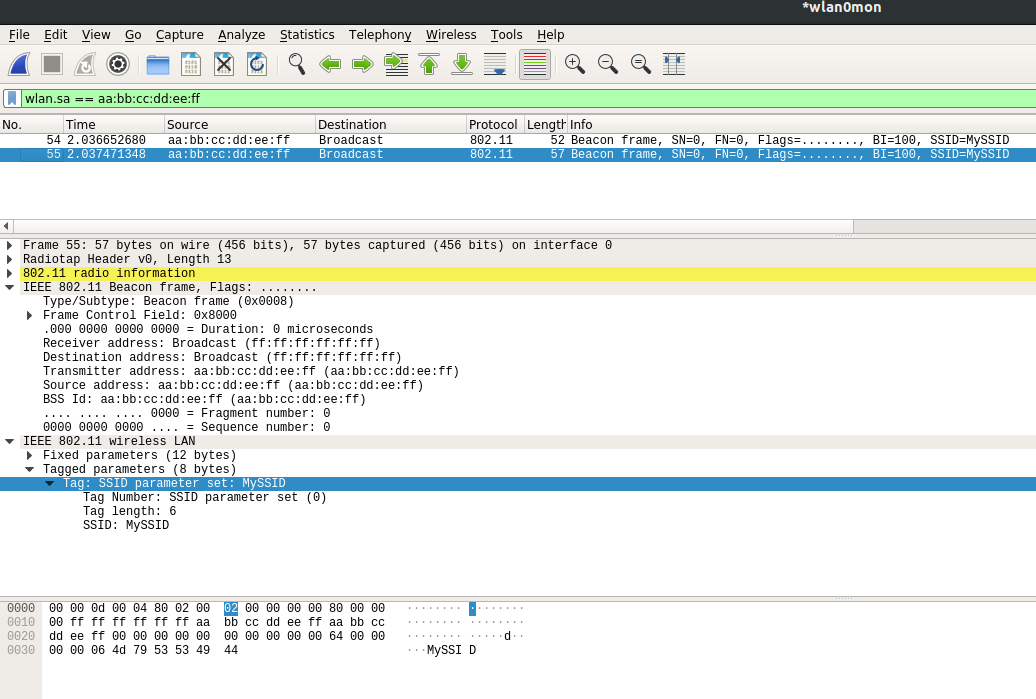
>>> beacon_pkt = RadioTap()/Dot11(addr1="ff:ff:ff:ff:ff:ff", addr2="aa:bb:cc:dd:ee:ff", addr3="aa:bb:cc:dd:ee:ff")/Dot11Beacon()/Dot11Elt(ID='SSID', info="MySSID")
>>> beacon_pkt.show()
###[ RadioTap ]###
  version   = 0
  pad       = 0
  len       = None
  present   = None
  notdecoded= ''
###[ 802.11 ]###
     subtype   = Beacon
     type      = Management
     proto     = 0
     FCfield   =
     ID        = 0
     addr1     = ff:ff:ff:ff:ff:ff (RA=DA)
     addr2     = aa:bb:cc:dd:ee:ff (TA=SA)
     addr3     = aa:bb:cc:dd:ee:ff (BSSID/STA)
     SC        = 0
###[ 802.11 Beacon ]###
        timestamp = 0
        beacon_interval= 100
        cap       =
###[ 802.11 Information Element ]###
           ID        = SSID
           len       = None
           info      = 'MySSID'
Here, we created a packet beacon_pkt where we appended each layer necessary to create a valid packet with a backslash. RadioTap() is the header your wireless card will fill out for you regarding physical properties like the channel. Dot11() is where we put information needed about who the reciever is, and who the sender is. In this case(2), for beacon frames, addr1 is the receiver/destination address and is set as the broadcast address, ff:ff:ff:ff:ff:ff. addr2 is the transmitter/source address, which I set as aa:bb:cc:dd:ee:ff, but you can use any other MAC address you’d like. addr3 is the BSSID, which is essentially the network address. Then we append Dot11Beacon() to designate that this is a management frame beacon packet. Finally, we add the Dot11Elt(), or the Dot11 element with an ID of SSID, or 0(3). We are now ready to send the packet!
>>> sendp(beacon_pkt, iface="wlan0mon")
.
Sent 1 packets.
If we open up Wireshark in another window and start capturing while sending, we’d see our packet being sent out as a valid beacon packet.
Scripting it
So that was pretty easy to do. Let’s script it, as it is Python after all.
from scapy.all import (RadioTap, Dot11, Dot11Beacon, Dot11Elt, sendp)

ssids = ["Never", "Gonna", "Give", "You", "Up"]
while True:
    for s in ssids:
        beacon_pkt = RadioTap()/Dot11(addr1="ff:ff:ff:ff:ff:ff",
            addr2="aa:bb:cc:dd:ee:ff",
            addr3="aa:bb:cc:dd:ee:ff")/Dot11Beacon()/Dot11Elt(ID='SSID', info=s)
        sendp(beacon_pkt, iface="wlan0mon")
Now to run it with sudo $(which python) send_beacon.py…
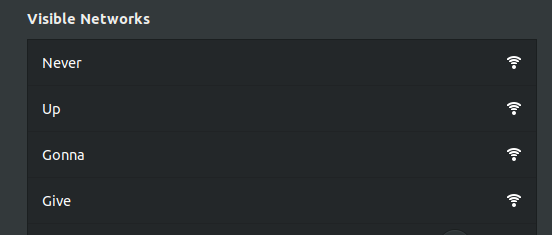
Well, close enough. The “You” part is somewhere down below but you can’t choose the order your WiFi card sees these packets unless you boost your transmission power levels, which is a no-no with the FCC.
And that’s it! A gentle introduction to Scapy.
-
There can be multiple virtual interfaces off of a single physical interface, i.e. your built-in WiFi card, that lets you do things like create and route multiple networks. This is how your wireless router can provide a guest network and a personal network on a single wireless interface. ↩
-
These addresses will depend on the type and subtype of the packet. Data and management frames for address fields generally are the same. Control frames however can vary widely, and may even only have only one address field. Here’s a quick source for to/from DS fields. ↩
-
In beacon packets, everything clients need to know about the network is appended as an element to the beacon packet, such as its encryption, what rates it uses, high throughput capabilities, vendor information, etc. Each element is designated with an ID, the length of the element, and the payload. ↩